Showing posts with label Renko. Show all posts

Friday, August 28, 2015

Roundup Of Recent Posts


I have been spending quite a bit of time on Renko trading strategies and also attempting to automate a Renko strategy, not much luck so far with the automation, Renko bars do not seem to work  well in automated trading for me.

The past couple weeks have been very volatile for traders. We have been dealing with the adjustments in the Chinese markets, fallout from the crisis in Greece and the supposed rate adjustments in the US.

Interesting times for all.

It appeared as the markets closed for the week that some stability may have returned, but we will have to see what happens when the markets reopen for next week..

Certainly there are adjustments happening in the currencies and that will probably continue for quite a while.

Enjoy the weekend!


Gold Analysis As At August 14, 2015
Ichimoku Renko Trading Strategy
Roundup of Posts for the Past Week
Renko Charting Explained
Chinese Yuan – What Has Happened?
US Dollar Index Trading Strategy As At August 15, 2015
Renko Awesome Oscillator Divergence Trading Strategy
Awesome Oscillator Renko Divergence Trade from August 17, 2015
7 Ways to Optimize Your Trading Strategy
Renko Trading Strategy EURUSD August 28, 2015
Highest Traded Individual Stocks Yesterday - from August 27, 2015
Highest Trading Stocks From Yesterday, August 28, 2015

Renko Trading Strategy EURUSD August 28, 2015


EURUSD is sliding on this Renko Chart


This morning the EURUSD pair is down considerably after rising earlier.

You can see on this Renko chart that price has fallen from a high of 1.1309 to 1.1258.


Renko Trading Strategy Eurusd August 28, 2015


The fall in the EURUSD today may be related to a softening rate of inflation in Europe as well as today’s meeting of the European Central Bank. There is some feeling that there will be Quantitative Easing proposed which may have considerable effect on the EURUSD.

Her are a couple current articles on EURUSD.


Slowing German CPI to Hit EUR/USD Ahead of ECB Meeting? - DailyFX
http://news.google.com Fri, 28 Aug 2015 08:00:26 GMT
Slowing German CPI to Hit EUR/USD Ahead of ECB Meeting?DailyFXSigns of slowing inflation in Europe's largest economy may drag on EUR/USD and push the European Central Bank (ECB) to broaden its quantitative easing (QE) program as it undermines the Gov ...
Read more ...
 
 
EUR/USD Technical Analysis: Aiming Below 1.12 Figure - DailyFX
http://news.google.com Fri, 28 Aug 2015 03:45:45 GMT
DailyFXEUR/USD Technical Analysis: Aiming Below 1.12 FigureDailyFXThe Euro declined for a third consecutive day against the US Dollar, with prices now aiming at support below the 1.12 figure. A daily close below the 61.8% Fibonacci retracement at 1.1 ...
Read more ...
 
 
Trade Idea: EUR/USD - Sell at 1.1370 - Action Forex
http://news.google.com Fri, 28 Aug 2015 08:30:56 GMT
Trade Idea: EUR/USD - Sell at 1.1370Action ForexAs the single currency has recovered after falling to 1.1203 yesterday, suggesting consolidation above this level would be seen and corrective bounce to resistance at 1.1364 cannot be ruled out, however ...
Read more ...


Sunday, August 16, 2015

Renko Awesome Oscillator Divergence Trading Strategy


A trader usually wants to know when the end of a trend is about appear so that he can adjust his trading strategy to take advantage of the next trend.

Of course, divergence between price and oscillator is one way to be prepared.

One of the indicators that will point out divergence is the Awesome Oscillator which is found in most charting packages.

Using Renko bars together with an oscillator is a great way to eliminate the chop and see clearly when there is a divergence appearing.

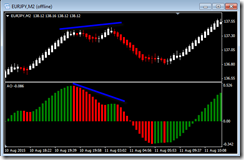
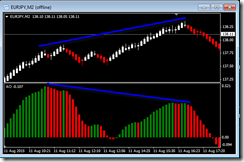
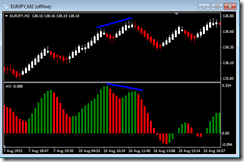
I have attached three charts on which I have marked divergences, just to give an idea as to how simple it is to spot them.

Divergences are not to be traded blindly as the market does not always change trend with a divergence. Therefore we have to observe price action before making any entry.

Screen time and practice is required to hone the skills in trading and divergence is not a shortcut to any success, the hours have to be put in to learning how to use divergence, the same as any other tool.


Awesome Oscillator Divergence Renko_Trading_Strategy 1


Awesome Oscillator Divergence Renkp_Trading_Strategy


Awesome Oscillator Divergence Renko_Trading_Strategy 2


Enjoy!

Friday, August 14, 2015

Renko Charting Explained

Renko charting has a history that I will develop in a future post. I have extracted this page from Stockcharts.com, it explains their application of Renko Charting on their site

Renko Charts

Introduction

Invented in Japan, Renko charts ignore time and focus solely on price changes that meet a minimum requirement. In this regard, these charts are quite similar to Point & Figure charts. Instead of X-Columns and O-Columns, Renko charts use price “bricks” that represent a fixed price move. These bricks are sometimes referred to as “blocks” or “boxes.” They move up or down in 45 degree lines with one brick per vertical column. Bricks for upward price movements are hollow while bricks for falling price movements are filled with a solid color (typically black).

Construction and Characteristics

Renko charts are based on bricks with a fixed value that filters out smaller price movements. A regular bar, line or candlestick chart has a uniform date axis with equally spaced days, weeks and months. This is because there is one data point per day or week. Renko charts ignore the time aspect and only focus on price changes. If the brick value is set at 10 points, a move of 10 points or more is required to draw another brick. Price movements less than 10 points would be ignored and the Renko chart would remain unchanged.
Using the S&P 500 10-point Renko chart as an example, a new Renko brick would not be drawn if the S&P 500 were at 1840 and advanced 9 points to 1849. If the S&P 500 then advanced to 1850 the very next day, a new Renko brick would be drawn because the entire move was at least 10 points. This brick would extend from 1840 to 1850 and be hollow, or white in this example. Alternatively, if the S&P 500 declined from 1840 to 1830, a new Renko brick would be drawn and it would be solid, or black in this example


The two charts above cover a six month timeframe, but the Renko chart sports an irregular date axis and the price action is less choppy. This is because the S&P 500 Renko chart ignores price moves that are less than 10 points and remains unchanged until there is a move of at least 10 points.

Close Versus High-Low Range

Renko charts can be based on closing prices or the high-low range by using the “field” setting in SharpCharts. Closing price means there is one data point per period and less volatility. The high-low range puts two data points into play and increases the fluctuations, which results in added bricks. The examples below show Renko charts for the S&P 500 and the box size is set at 10-points for both. The first chart is based on closing prices and the second is based on the high-low range. Notice that the Renko chart based on the high-low range fluctuates more than the close-only Renko chart.


Fixed Value versus ATR

Chartists can use the “box” settings to set brick size as a specific value or as the Average True Range (ATR). A specific point value means brick size will remain constant even as new data is incorporated into the chart. In other words, new price data is added every trading day and the brick size will remain constant. The two charts above have a fixed value and each brick represents ten points.
In contrast to fixed price bricks, brick size changes change when the ATR value is used. The default ATR is based on 14 periods and the Average True Range fluctuates over time. The brick size is based on the ATR value at the time the chart is created. Should the ATR value change the next day, then this new ATR value will be used to set the brick size. Also note that ATR values are based on standard charts, such as close-only, bar and candlestick. These charts have one data point per period and a uniform x-axis (date axis). The ATR value shown on these charts can differ from the ATR brick value on a Renko chart due to rounding issues.

The next two examples show how the ATR value changes when the ending chart date changes. The first chart ends on June 10th and the ATR value is 12.05, which is the value for each Renko brick. The second chart ends on April 15th and the ATR value is 20.55, which is the value for each Renko brick. Notice how the brick value changed as the ATR value changed. The bricks on April 15th have a much higher value than the bricks on June 10th.


Trends, Support and Resistance

White bricks form when prices rise a certain amount and black bricks form when prices decline a certain amount. The image below shows a daily S&P 500 chart with 10-point bricks and a 10-period simple moving average. Note that a 10-period moving average calculation is based on the last ten Renko values, not the last ten trading days. An indicator on a Renko chart is based on Renko values and will differ from the same indicator on a bar chart. Chartists can typically use shorter moving averages on Renko charts because smaller price movements have been filtered out.

Chartists can use troughs to mark support levels and peaks to mark resistance levels. Chartists can also look for a two brick reversal to signal a trend change. Notice how the index fell with five black bricks in August and again in September-October. These declines looked like falling flags. A reversal occurred when two white bricks formed and broke above the short-term resistance level. Chartists can also apply the Fibonacci Retracements Tool to Renko charts.

Conclusions

Like their Japanese cousins (Kagi and Three Line Break), Renko charts filter the noise by focusing exclusively on minimum price changes. Renko bricks are not added unless price changes by a specific amount. As with Point & Figure charts, it is easy to spot important highs and lows, and identify key support and resistance levels. Armed with this information, chartists can identify uptrends with higher highs and higher lows or downtrends with lower lows and lower highs. As with all charting techniques, chartists should employ other technical analysis tools to confirm or refute their findings on Renko charts.

SharpCharts

Chartists can create Renko charts by going to the “Chart Attributes” section and selecting Renko as the chart “Type”. This section is just under the SharpChart on the left side. Users will then be able to choose between points or ATR, and then set the parameters for these two options in the next box.
The “ATR” setting uses the Average True Range indicator from the symbol's underlying bar chart to determine an “Automatic” value for the Renko chart's box size. Note: This ATR value might change as prices change which can cause the Renko chart to change significantly whenever it is updated.
The “field” can be set at close or high-low range. Chartists looking for more sensitivity can choose the high-low range. Chartists looking to focus on end-of-day price data can choose the close. The brick colors can also be changed using the “up color” and “down color” drop down menus just below the SharpChart. Click here for a live example.

Note: If the phrase “AT LIMIT” appears at the top of a chart, it means that the box size specified would result in a chart that is too large for us to display. In that case, we increase the box size to the smallest size we can successfully display and add the “AT LIMIT” message to the top of the chart.




Ichimoku Renko Trading Strategy


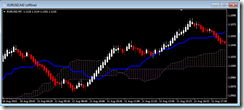
You will find this Renko Strategy to be extremely simple and also very profitable as a quick scalping method. Once again, the indicators for this system are included in most trading packages or are freely available for download on the internet.

The only indicator I use for this method is the Ichimoku Kinko Hyo and I just use the Ichimoku Cloud and Tenkan Sen.

The Renko blocks are three (5) pips, they move quickly when the markets are busy.

The Strategy

You can see from the chart how well this method allows a trader to follow the trend.
For a long entry – price is above the Tenkan and also above the Kumo
For a short entry – price is below the Tenkan and also below the Kumo.
As you can see, the Renko bars point out clearly the places for adding to positions or re entry.

image

image

I put some arrows on this next one to show a couple entries.
image

For myself, I have been trading for many years, longer term trading and also day trading. I find this method of using the Ichimoku cloud and fast Renko Bars to be quite effective and profitable. The simplicity of this method allows me to have several charts open at once so as to make trades on different currency pairs simultaneously..

Of course a person can not expect to master this set up in a few minutes, it will take many hours of screen time and demo trading to get used to it.

Keep in mind that the better trades are made in a market that is trending with volume. I suggest that you look at another currency when the Kumo is flat in order to avoid the irritation of your stop being met.
In a future post I will discuss this method with CFD’s, it works just as well with all nature of CFD’s.

Enjoy!

Thursday, August 13, 2015

Renko Moving Average Trading Strategy


Here is a very simple and profitable Trading Strategy using a Moving Average, Renko Bars and the Stochastic Oscillator.


You will easily recognize this as a profitable strategy and so simple..

Configure the chart

We need on the chart Renko Bars, a 25 Moving Average and Stochastic Oscillator set at 14,3,3.

Long Entry


The Stochastic has been below the 20 line and is crossing back up, the Renko bars have crossed above the moving average a couple bars after the stochastic cross. You can see the arrows on the chart below.

image


Short Entry

The stochastic has been above the 80 line and hooked down, the Renko bars have crossed below the moving average a couple bars after the stochastic cross. Refer to the arrows on the chart.


image


Those are the two basic entries for this system. You may find that you wish to add to your position when there is a continuation trade available. I will post some examples of continuation trades on another post.

For reference here are a couple more Renko methods, you will see that they too are quite simple.

http://boutiquetradingstrategies.blogspot.ca/2015/08/how-to-build-forex-renkotrading.html
http://boutiquetradingstrategies.blogspot.ca/2015/08/renko-trading-strategies-3.html
http://boutiquetradingstrategies.blogspot.ca/2015/08/renko-trading-strategies-2.html
http://boutiquetradingstrategies.blogspot.ca/2015/08/renko-trading-strategies-1.html

Monday, August 3, 2015

How To Build a Forex RenkoTrading Strategy to Yield 40 Pips Every Day

As traders, we all want to have a positive cash flow, we all want to make enough money to pay for our time and work, here is a Forex Renko Trading Strategy that will help to reach that goal.

What we need is a consistent strategy, a time frame in which we are going to be at the screen to do our trading and the discipline to stick at it until we succeed.

We have to know, also, that we can not get every move in the market place. It is folly to chase every move or every trend. We can only get the moves that our strategy will point out.

I have a Forex Renko Trading Strategy method to help us to achieve a reasonable amount of profits daily.

I will lay it out in simple form, hopefully so that people can understand it and see the simplicity and be able to execute successfully.

For this exercise we will be using Metatrader 4 and setting up some Renko charts.

I will briefly cover how to get the Renko charts built.

First we will open one minute charts for several currency pairs, the majors, to start with. Of course you have your personal preferences as to which pairs you like and feel free to choose. In addition to those, open a one minute chart for the Dax index.

On to each of those charts place the EA Renko 3.4 and set the bar size to 10 pips, except for the DAX which could be about 50 pips.

This action will build an offline chart for each of those instruments, open those and shrink the one minute charts.

Now, on the M2 offline charts. for each one you are going to want to change each to a 'line' chart' and go into the properties for each chart and change the 'line'  to have no color...

Now add the Heiken Ashi bars to each chart. and now we have our work charts almost set up. You will have 5 or 8 charts ready to go.

The next step is to get the indicators on the chart, the ones we are going to use to detect our entries.

Configure your chart the same as the chart in this post, the CCI SlingShot;

You need the two CCI in the same lower chart. Have a look at that post and be sure to grasp that simple method.

Do the same for all of your offline charts, perhaps make a template after the first one and apply that template to all the rest..

I think you are seeing how this system is really simple.. We are going to trade slingshots, they happen frequently and they are so easy to spot on a chart.

Now that we have the charts set up, one more thing to do.

Have a look at this post and review the 200 Trendline Break entry.  Study this one carefully.

Get used to spotting this one as it is the entry that will help you with  finding a trend change.

So far, you have a trend change entry and also a continuation move entry.... in other words, when something is moving, you can capture every part of the move, and if you are careful and disciplined you are going to do very well on each move on each pair.

One more thing we have to study before we have this concept.

Have a look at this post about CCI Divergence. Study the diagram and learn to mark this divergence both long and short. This is the warning for a pending trend change in many cases.

Now you have two patterns to enter with and a divergence tool. and nice clean charts.

You can shrink the charts down a bit and probably can watch  quite a few charts ion this way.

While the title of this article mentions 40 pips every day, I know from personal experience that this setup will give you a lot more than 40, especially if you are watching the DAX.

I am not sure if there is a simpler trading system than this, certainly the trades show themselves clearly and you have the indicator to give you precise entries.

I caution you against adding much to the charts, perhaps a 50 moving average, other than that leave the chart clean. 

Chart clutter causes confusion and will help to make mistakes.

Please be sure to use a stop loss with every entry, that is most important!

Enjoy!


Tuesday, November 25, 2014

Renko Trading Strategy


Renko Bars are not the most populartrading strategy but they are quite effective for filtering out thechoppy periods and when used judiciously can be quite profitable.

As an example, I have two charts of EURUSD from this morning, one just prior to a sudden drop and onetaken a few minutes after the drop. You can see how the chart workedwell for me using the Awesome Oscillator for entry and the TSIOsc forexit. I also watch the TSIOSC for warning of a pending shift intrend.


Traders use different bar sizes fortheir Renko charts and that is a matter of preference. Some peoplelike a 2 pip bar and others use up to 50 pips, depending on how oftenthey want to trade and be at the screen watching charts.

Some trading platforms have a Renko chart built in as an indicator and many do not, meaning that a custom indicator has to be used. Sometimes in the case of a custom indicator there is quite a demand for machine resources which limits the number of charts that can be used .

There are custom indicators for both Metatrader4 and Metatrader5.

Renko trading is a great strategy in that a person can see clearly the entries and place stop losses that work well based on the size of the Renko bars on that particular chart.

I have not found any trailing stop expert advisers that will work on a Renko chart, they have to be attached to the regular chart for that currency pair.

Nor have I found a trade manager that will work on a Renko chart, again the trade manager has to be attached to a regular currency pair.

Those are a couple things that make trading with Renko bars a little awkward.

However, even with a couple negatives the Renko Trading Strategy can be enjoyable and profitable.


I will add one more chart, a 40 pip move that just occurred, actually the move was for a bit more than 40 pips.


Tuesday, August 26, 2014

Can you Use A Stochastic Momentum Index Trading Strategy

Simplified and profitable trading strategy.


The Stochastic Momentum Index offers asimplified approach to trading, especially with Renko bars.

This indicator is easily located with asearch on the internet as it is not included in all chartingpackages, if not found it can easily be coded to suit whicheverplatform requires it.

I am attaching three charts from todayand you will see that it shows a pending change in direction as itapproaches and passes the 40 level.


Personally, I use a moving average asshown on the charts as a confirmation.

On each of the charts above, you willeasily see how the trend change was depicted, making this indicator asimple way to measure as to when entries and exits can be made.

Each trader will have to adjust theindicator settings to get the chart to talk to him/her vividly, otherthan that the indicator does not need much else in the way ofsupport.

Study these charts for a few minutesand then have a glance at the articles I have attached to clarify thevarious applications of the indicator.


Once you have studied the articles andthe charts you will be able to easily adapt the Stochastic MomentumIndex to your trading system.

I have added an excellent video at the bottom of the page, the author explains in detail as to how she uses this tool.


Technical analysis: key levels for FTSE, DAX and Dow - IG
Tue, 26 Aug 2014 10:04:15 GMT
Technical analysis: key levels for FTSE, DAX and DowIGHowever, with the stochastic momentum index also sitting at extreme levels traders should be careful before going all in. A look at the intraday chart shows that 6820 is holding back upward moves ...
Read more ...

Here are some tips as to the use of the indicator

Stochastic Momentum Index: Its Formula and Trading Use ...
http://www.informedtrades.com/ Wed, 11 Dec 2013 16:16:59 -0800
Trade the Stochastic Momentum Index Indicator on the Forex.com Platform KEY POINTS REGARDING THE STOCHASTIC MOMENTUM INDEX Introduced by William Blau.
Read more ...


FREE TIME USER: Stochastic Momentum Index (SMI)
http://freetimeuser.blogspot.com/ Mon, 13 Feb 2012 01:11:15 -0800
Stochastic Momentum Index (SMI). Developed by William Blau in 1993, it is an extension of the Stochastic Oscillator indicator, only calculated slightly different (it regards the mid range instead of the true range of the price per period).
Read more ...

The following article emphasizes the simplicity available from this strategy.

Stochastic Momentum Index Strategy Review | Forex ...
http://forex-trading-blog.com/ Tue, 14 Jan 2014 06:06:40 -0800
Stochastic Momentum Index Strategy Review. It is Easy to learn Forex strategy that takes only a few minutes a day to find and manage trades. It uses readily available charting tools and visually oriented method for rapid and systematic ...
Read more ...


The author of this video goes into detail as to how she applies the indicator to her charts and how she interprets it. This is well worth watching.


Make A Great Profit with A Renko Trading Strategy.


Make A Great Profit with A RenkoTrading Strategy.


This morning Google offered a greatopportunity in the pre market for quick profits.

There was a significant drop, the movewas quick, price bounced back up and then down and now it is tradingin a range that allows some profits as it skips back and forth.

This is a Renko chart which is actuallyquite simple and clearly shows the moves.


The three moving averages are sma5 onthe open shifted 1, 3, and 5.

Renko offers a way of monitoring themarket and accurately entering and exiting while avoiding poorentries due to choppiness.

There are many ways to configure aRenko chart, some are quite simple and some are more complex, it isup to the user to configure his chart so that it speaks loudly tohim.

Renko charts offer an alternative whichis well worth studying.

Google is especially suited to a Renkochart because of its price moves throughout most days.


Here are a couple more Renko charts,one for Gold and another for Oil. Again you can see that these areeasy to trade with and quite profitable.